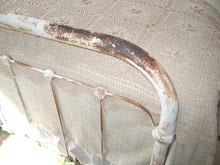
BEFORE ...not ugly just very... very white.


I've completed another project...in my Master I just could not get past the headboard. It wasn't horribly ugly but it just took my bedroom from looking less than cottage chic...and far more victorian than I wanted it to feel. I need a headboard since our bed backs up to a window for all my pillows. I really wanted it to blend-in not stand out. So my motto ..."if we don't like it ...we change it."
1. I took some old fabric and made a pattern on half of the headboard by pinning wrong sides together for a front and back.
*You only need to make a pattern half the size of the headboard since both sides are the same.
2.Once pinned I took a marker along the pins making small dashes.
3. I removed the pattern and connected the dashes (so you see what the pattern looks like before you cut).
**The beauty of a pattern is that you can make duplicates without having to measure everytime. You may want to get really creative using buttons or ribbon or fabric ties.
4. I cut out the pattern (one for front and one for back) I then took to machine and started sewing pieces together. To keep it simple I sewed all the way around (without ribbons,buttons ect..)
5. Turn right sides of fabric out and Walaaaaa....a simple sleeve to hide the headboard. I will be making other sleeves for different looks....SEW EASY!!....